
TL;DR
Natural AI portraits start with clear, current source photos and end with restrained editing. Select outputs for likeness before polish, then correct exposure, color, and framing without changing facial structure or erasing skin texture. Keep an untouched master and check the exported portrait at its final display size.
A believable AI portrait needs recognizable features more than flawless skin. The strongest photo and editing workflow for natural AI portraits separates four decisions: choosing source images, generating variations, selecting believable results, and making light corrections.
For professionals preparing LinkedIn headshots, creator profiles, or business imagery, Looktara provides a relevant starting point for AI portrait creation. A consistent review process helps keep the finished image aligned with the person it represents.
Natural AI portrait: An AI-generated image that preserves recognizable likeness, plausible lighting, and believable texture.
Editing workflow: A repeatable sequence of adjustments that turns a selected image into a finished, purpose-ready portrait.
Table of Contents
Which source photos produce natural AI portraits?
Natural AI portraits benefit from clear, recent source photos that show consistent facial features under ordinary lighting. A useful set includes front-facing and slightly angled views, realistic skin detail, and familiar expressions. The goal is reliable visual information about the person, not a collection of heavily styled photographs.
Build a source set around recognizable features
Start with photographs that resemble the subject's current appearance. A recent hairstyle, usual facial hair, and regularly worn glasses help establish a useful reference. Follow the chosen platform's upload requirements rather than assuming every service needs the same image count.
- Include clear front-facing and gentle three-quarter views.
- Use soft window light or evenly shaded outdoor light.
- Include a relaxed expression and a natural smile.
- Prefer original files over screenshots or social-media downloads.
- Choose images where the face is large enough to inspect.
A plain background makes visual review easier. Clothing can vary, but the face should remain consistently recognizable across the set.
Separate identity references from style references
Identity references show who the person is; style references communicate clothing, setting, and mood. Keeping those roles separate helps prevent a polished inspiration image from becoming the standard for facial appearance.
Beauty-filtered selfies, strong perspective distortion, and old photographs can introduce conflicting visual cues. A close camera held above the face, for example, may make the eyes appear larger and the chin smaller than in an ordinary headshot.
Source-selection rule: Favor clear evidence of the person's appearance over dramatic lighting or flattering filters.
How should AI portrait variations be generated?
- Define the portrait's destination and intended impression.
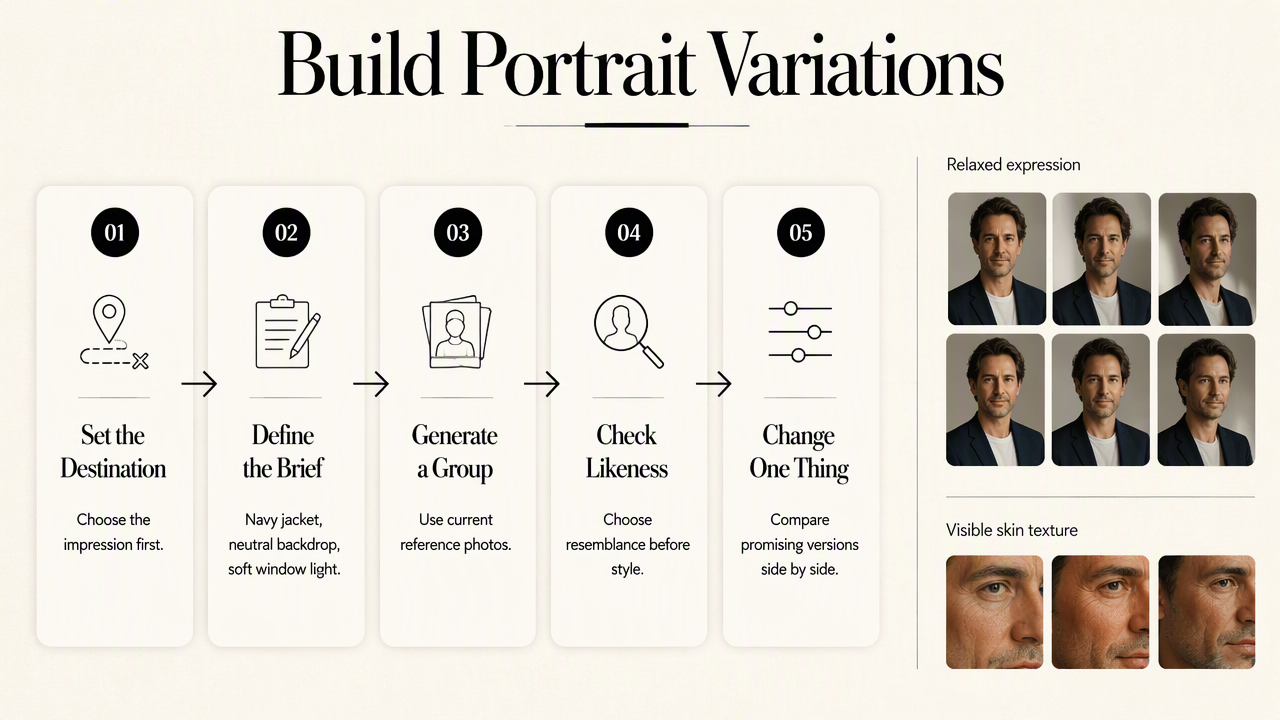
- Choose one simple setting, outfit, and lighting direction.
- Generate an initial group of variations using the selected references.
- Review likeness before changing the style.
- Adjust one variable at a time, keeping promising versions for side-by-side comparison.
Write a brief that describes a real photograph
A useful brief names observable details rather than vague perfection. For a professional profile, an example is: head-and-shoulders portrait, navy jacket, neutral background, soft window light, relaxed expression, visible skin texture. These are creative instructions, not guarantees that every tool will follow them exactly.
Change the background separately from the outfit or expression. That makes it easier to identify which change improves the portrait. Save the brief alongside each shortlisted output so successful choices remain repeatable.
Oppenlaender, Linder, and Silvennoinen's 2024 paper examines prompt engineering as a creative skill. Oppenlaender's 2022 paper addresses creativity in text-to-image generation. These research topics provide context, not portrait-specific performance benchmarks.
How Looktara handles this workflow
The Looktara platform can sit at the generation stage of this workflow, with source selection before it and final image review afterward. The practical approach is to establish the intended use first, then evaluate generated portraits against the same identity and presentation criteria.
For fitness professionals preparing business-facing imagery, the fitness LinkedIn photo generator offers a relevant starting point. Creators planning fitness-focused social content can explore the fitness Instagram photo generator instead. Destination-specific planning helps define the crop, wardrobe, and background before editing begins.
How can the most realistic output be selected?
- Compare each candidate with a recent, unfiltered reference photo.
- Check facial proportions, hairline, expression, and familiar details.
- Inspect eyes, teeth, ears, glasses, and visible hands at full size.
- Confirm that lighting and shadows agree.
- Preview the portrait at its intended profile size before choosing.
Use an identity-first selection scorecard
A selection scorecard keeps an attractive background from outweighing an inaccurate face. Mark each criterion as pass, review, or reject rather than assigning a misleading precision score.
| Criterion | What a convincing portrait shows | Selection decision |
|---|---|---|
| Likeness | Familiar face shape and proportions | Reject structural mismatches |
| Expression | A smile or neutral look typical of the subject | Review unfamiliar expressions |
| Anatomy | Coherent eyes, teeth, ears, and hands | Reject visible distortions |
| Lighting | Shadows consistent with the light direction | Review conflicting shadows |
| Texture | Visible detail without excessive smoothing | Prefer believable detail |
| Context | Clothing and setting suited to the destination | Select for the intended use |
Inspect the portrait at two viewing sizes
Full-size inspection reveals merged jewelry, uneven glasses, strange tooth edges, or repeating skin patterns. Profile-size inspection reveals a different problem: a portrait may be technically detailed yet unreadable when reduced to a small circle.
Use a recent reference beside the candidate, not memory alone. Ordinary facial asymmetry deserves special attention because making both sides perfectly identical can change the person's appearance.
Selection rule: A convincing face in a simple scene is a stronger starting point than an impressive scene with uncertain likeness.
Which light edits improve portrait credibility?
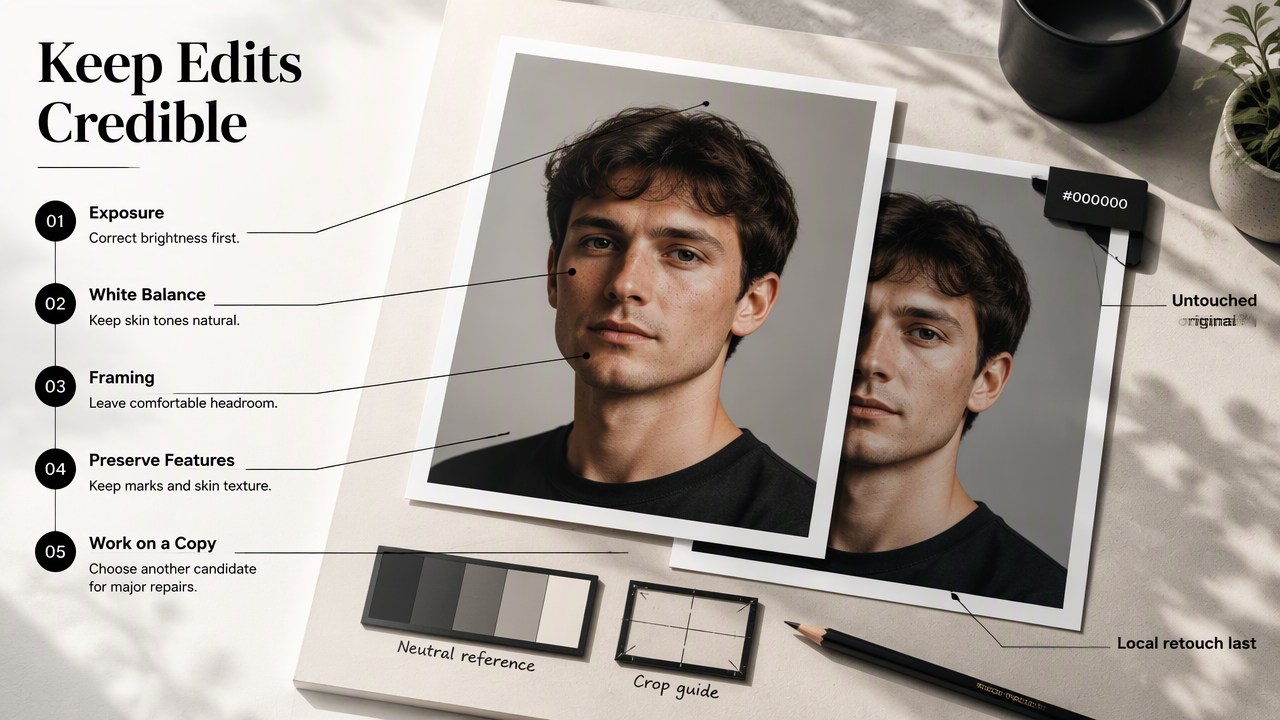
Light portrait edits improve credibility when they correct presentation without redesigning the person. Adjust exposure, white balance, framing, and small distractions first. Preserve facial structure, characteristic marks, and natural skin variation. If an output requires major anatomical repair, selecting another candidate is usually the cleaner approach.
Apply corrections in a controlled sequence
Keep the selected original untouched and work on a copy. Complete broad corrections before local retouching so a later color adjustment doesn't undo earlier work.
- Crop: Leave comfortable headroom and test the destination's circular or rectangular frame.
- Exposure: Keep detail in bright skin areas and dark hair.
- White balance: Correct obvious color casts while retaining plausible skin tones.
- Local cleanup: Remove minor background distractions without altering identity.
- Texture and sharpness: Apply restrained adjustments, then inspect at full size.
- Export: Match the destination's current file requirements and reopen the exported file.
For example, a warm indoor cast may need a modest color correction, not a replacement skin tone. Sharpening should clarify existing edges rather than draw bright outlines around hair.
Distinguish trust-building edits from artificial polish
Trust-building edits improve readability; artificial polish replaces recognizable detail.
| Area | Edit that supports trust | Edit that can look fake |
|---|---|---|
| Skin | Correct uneven exposure while preserving texture | Blur pores into a uniform surface |
| Eyes | Reduce a distracting color cast | Enlarge irises or make whites unnaturally bright |
| Face | Retain familiar proportions | Narrow the jaw or reshape the nose |
| Teeth | Keep natural shade and separation | Create identical, brilliant-white teeth |
| Background | Remove a small distraction | Add blur that cuts into hair or glasses |
The 2021 review by Anantrasirichai and Bull examines AI across creative industries. It provides broad context rather than a tested recipe for natural portrait retouching. For a 2026 publishing workflow, the useful safeguard remains a documented comparison between the original, edited version, and final export.
Natural AI portrait workflow FAQ
A natural portrait workflow should preserve identity across editing, publishing, and later updates.
Final-use check: Recognition matters more than visual perfection.
Can an AI portrait be used for a LinkedIn profile?
An AI portrait can serve as a LinkedIn profile image when it accurately represents the person and complies with the platform's current rules. A professional-looking result should retain current facial features and a plausible expression. Check the circular crop, avoid misleading workplace cues, and compare the image with a recent photograph before publishing.
Should skin texture be added during editing?
Existing believable texture should be preserved before artificial texture is added. A uniform grain overlay may change the surface appearance without correcting an over-smoothed face. If skin already looks plastic, another generated candidate may provide a better starting point. Any texture adjustment should remain subtle and be checked on the face, hair, and background separately.
Should AI portraits be disclosed on dating profiles?
Dating profiles benefit from clear expectations and recent photographs that show the person accurately. Follow the app's current rules and disclose AI generation where required or where the image could create a misleading impression. A generated portrait shouldn't replace every real photograph, especially when appearance, age, or lifestyle cues differ from reality.
Conclusion
Put the workflow into practice with a clear source set, one destination-specific brief, and an identity-first shortlist. Then make light corrections and inspect the final export at profile size. Professionals ready to create AI portraits can visit looktara.com and explore Looktara, keeping a recent reference photograph beside each candidate before publication.
Generated by EarlySEO.com